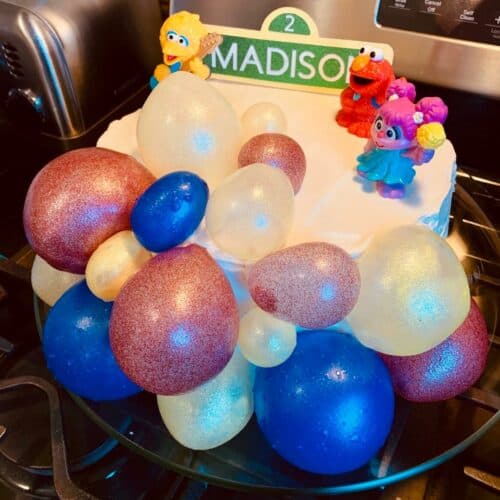
Gelatin Bubbles
Simple instructions for a "WOW" factor on your next cake decorating adventure
Ingredients
- Balloons Decide ahead of time how big you want your 'bubbles' so you know what balloons will work best. Works best to make bubbles 2-5 inches in diameter.
- Bamboo Sticks
- 1 package Unflavored Gelatin
- Glitter Dust/Luster Dust to color your balloons
- Shortening to coat the balloons
- Cold Water
Instructions
- Blow up balloons to desired sizes for your project. I did a variety of sizes since there was a likelihood of less than 100% turning out the way I wanted. I planned to make some extra. As I inflated the balloons, I found that if I overinflated slightly, then pressed down on my chest to let a little air out, I would get a more round/bubble-like quality to the shape.
- Tie balloons onto bamboo sticks. I broke mine in half since they are pretty long to begin with.
- Coat balloons in a very thin layer of shortening. This will help the balloon detach from the gelatin when you want to put it on the cake.
- Mix your gelatin. Mix separate bowls for each color you want to use. Use a 1:2 ratio for gelatin to cold water. It works well to get it about the consistency of syrup, because you will pop it in the microwave which will make it more liquid and you don't want it too runny.
- Once your gelatin/water mix is the right consistency, add your color dust and mix it in.
- Pop into the microwave for 10 seconds. Check the mixture, it should be slightly warm and a good thick liquid for coating.
- Coat your balloons. Turn them in different angles to get the whole thing EXCEPT the balloon knot. You want that and the surrounding area exposed.
- Once coated, you can allow your balloons to try on a drying rack, or if you can stick them in some Styrofoam you will keep more of the full bubble look. In this attempt, I used a drying rack which was ok for the final product.
- Continue until all balloons are coated in all the colors you want.
- Let it set for 24 hours. I have seen some instructions suggesting 12, but I err on the side of time. This does mean you have to really plan ahead. This isn't something you can whip up two hours before a party.
- When you're ready to remove the balloons and assemble your cake, simply make a small cut in the balloon near the knot and the balloon should very easily detach from the gelatin.
- Use scissors to cut around the opening to make it smooth if needed. And if any gelatin became a bit dented in the balloon removal, it should pop back out.
- Add to your cake! I simply stuck them in the icing and then piled them on each other. Hopefully, it gives your cake a really fun effect that everyone will enjoy!
Nutrition
Calories: 94kcalProtein: 24gFat: 1gSaturated Fat: 1gMonounsaturated Fat: 1gSodium: 55mgPotassium: 4mgCalcium: 15mgIron: 1mg
Tried this recipe?Let us know how it was!